If you’re a creator / brand manager who posts Reels on Instagram, you’d probably agree that you frantically keep refreshing views to see if you the reel you posted a few minutes ago has achieved escape velocity.
This guide breaks down how to build a custom, automated tracking system using n8n and Airtable. It automatically logs your new Reels, tracks the views at fixed time intervals (15m, 30m, up to 2 days), and lets you compare early performance against your historical baselines so you know within an hour if your Reel is going viral or if you need to delete it and try a new hook.

Part 1: Setting up Airtable, authenticating with Meta, building automation to detect and log new Reels.
Step 1: Setting up the Airtable Database
Before we can track anything, we need a place to store the data. Create a new Airtable Base and a table named Reel Tracker.
Create the following fields (columns) with their exact corresponding field types:
- Media ID:
Single line text(This is the unique Meta identifier for your Reel) - IG Created At:
Date(Include time) - URL:
URL - The Time Buckets: Create a
Numberfield for each of the following intervals: 15m, 30m, 45m, 60m, 2h, 4h, 12h, 24h, and 2d. (These will hold your view counts as the Reel ages).
You will also need an Airtable Personal Access Token to connect n8n to your base. You can generate this in your Airtable Developer Hub.
Step 2: Finding your Meta IDs and API Tokens
Instagram’s API routes through Facebook’s infrastructure. To query your Instagram data, you first need the ID of the Facebook Page connected to your account.
Here is the fastest way to get your IDs and tokens using the Meta Graph API Explorer:
Step a: Find your Facebook Page ID
- In the Graph API Explorer, ensure the method is set to GET.
- In the path field, enter
me/accountsand click Submit. - In the JSON response, locate the page connected to your Instagram and copy its
id.
Step b: Find your Instagram Business Account ID
- Replace
me/accountsin the path field with your newly copied Page ID, followed by this query and hit submit
{{page-id}}?fields=instagram_business_accountThe API will return your instagram_business_account ID. Copy this down—it is the master key for your n8n workflow.
Generate your Long-Lived Access Token
To successfully pull view metrics later, your token must be a Page Access Token (not a User token). Ensure the following scopes are added in the “Permissions” sidebar:
instagram_manage_insights(This is the critical one)instagram_basicpages_read_engagementpages_show_list
Generate the token, then head to the Meta Access Token Debugger. Paste your token, scroll to the bottom, and click “Extend Access Token” to create a long-lived token. This prevents your n8n workflow from breaking every few hours.
Step 3: The n8n Automation Logic (Logging New Reels)
Now we build the pipeline. The goal of this workflow is to wake up every 15 minutes, check your Instagram account for the latest post, verify that it’s a Reel, and log it into Airtable—but only if it hasn’t been logged already.
Node 1: Schedule Trigger
Set the trigger to run every 15 minutes.
Node 2: HTTP request
Send a GET request to the Meta Graph API to pull your most recent post.
Endpoint URL:
https://graph.facebook.com/v21.0/{{instagram-business-id}}/media?fields=id,shortcode,media_type,media_product_type,caption,timestamp&limit=1Authentication: Pass your long-lived Meta access token here.
Node 3: Filter (this ensures we’re fetching only reels)
Instagram returns all post types in that endpoint. We only want videos.
{{ $json.data[0].media_product_type }} = REELSNode 4: Search Records (to check if this Reel ID already exists)
Before creating a new row, we must check if this Reel is already in our database.
{Media ID} = {{ $json.data[0].id }}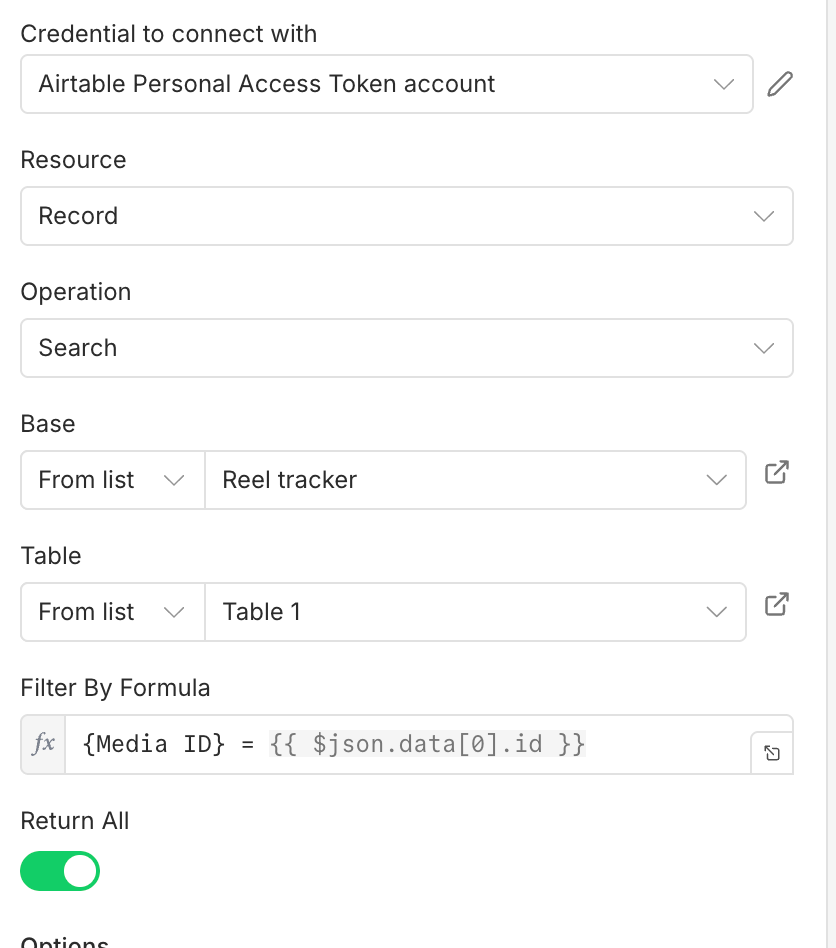
⚠️ Crucial Step: In the Node Settings, toggle “Always Output Data” to ON. If Airtable finds no match (meaning the Reel is brand new), the node outputs an empty item instead of stopping the workflow entirely.
Node 5: If Node (Routing)
We only want to proceed to creation if the previous node found nothing.
{{ $json.id }} IS NOT EMPTYNode 6: Create or Update Airtable
To avoid n8n mapping errors from previous nodes, use the .first() expression to reliably grab the data from your Filter step.
Map the following fields:
Media ID
{{ $('Filter').first().json.data[0].id }}IG Created At
{{ $('Filter').first().json.data[0].timestamp }}URL
https://instagram.com/p/{{ $('Filter').first().json.data[0].shortcode }}Part 2: Fetching Insights and Time-Based Bucketing
In Part 1, we built the mechanism to automatically log every new Reel into Airtable. But a static database isn’t a dashboard.
To actually know if your Reel is going viral, we need to track its trajectory. Part 2 is the engine of this system. It’s a recurring workflow that constantly polls Meta for your Reel’s view count, calculates exactly how old the video is, and slots the data into the correct time-bucket column (15m, 30m, 45m, etc.) in your Airtable.
Here is how to set up the insight-fetching loop.
The Automation Logic
We only want to query Meta for Reels that are still actively in their 48-hour tracking window. Fetching all records from the beginning of time every 15 minutes will quickly exhaust Meta API rate limits and overload your n8n instance.
Create a new n8n workflow and add the following 5 nodes:
Node 1: Schedule Trigger (The Heartbeat)
- Set the trigger to run every 15 minutes.
Node 2: Airtable Search (Fetch Active Reels)
- Operation: Search Records
- Base & Table: Select your
Reel Tracker. - Filter By Formula: We need to filter out old Reels where the tracking is already complete. Since our final column is
2d(2 days), we only pull rows where this cell is empty.
IF({2d} = BLANK(), TRUE(), FALSE())Node 3: HTTP Request (Fetch Current Views)
Now we pass the active Media IDs to Meta. Because n8n handles arrays natively, you don’t need a standalone loop node; mapping the ID dynamically will execute the request for every active Reel found in the previous step.
- Method:
GET - URL:
https://graph.facebook.com/v22.0/{{ig-business-id}}/insights?metric=views- Authentication: Pass your Meta Page Access Token (the same one used in Part 1).
- In the “Settings” tab, keep On Error to “Continue”
Node 4: Code Node (The Bucketing Logic)
We need JavaScript to cross-reference the live view count from Meta with the original creation timestamp in Airtable. It calculates the exact age of the Reel in minutes, determines which bucket it belongs in (with a small time buffer to account for API/cron delays), and formats the data for Airtable.
Add a Code Node, set it to Run Once for All Items, and paste this script:
const metaData = $input.all();
const airtableData = $('Airtable Search').all();

let itemsToUpdate = [];

for (let i = 0; i < metaData.length; i++) {
  const payload = metaData[i].json;
  const recordId = airtableData[i].json.id;

  // 1. THE FIX: Check if Meta returned an error (e.g., Reel was deleted)
  if (payload.error || !payload.data) {
    // We push a '-1' to the '2d' column.
    // This fills the blank cell, preventing the Airtable Search node
    // from pulling this deleted Reel in future runs.
    itemsToUpdate.push({
      json: {
        id: recordId,
        "2d": -1
      }
    });
    continue; // Skip the rest of the loop for this specific Reel
  }

  // 2. Extract the views from the Meta API response
  const views = payload.data ? payload.data[0].values[0].value : payload[0].data[0].values[0].value;

  // 3. Get the 'IG Created At' that specifically matches this loop's item
  const createdAtStr = airtableData[i].json["IG Created At"];
  const createdAt = new Date(createdAtStr);
  const now = new Date(); // UTC by default in JS

  // 4. Calculate difference in minutes
  const diffMinutes = Math.floor((now - createdAt) / (1000 * 60));

  // 5. Assign the bucket (using a +/- 10 min buffer for cron/API delays)
  let bucket = "";
  if (diffMinutes >= 5 && diffMinutes <= 25) bucket = "15m";
  else if (diffMinutes >= 20 && diffMinutes <= 40) bucket = "30m";
  else if (diffMinutes >= 35 && diffMinutes <= 55) bucket = "45m";
  else if (diffMinutes >= 50 && diffMinutes <= 70) bucket = "60m";
  else if (diffMinutes >= 110 && diffMinutes <= 130) bucket = "2h";
  else if (diffMinutes >= 230 && diffMinutes <= 250) bucket = "4h";
  else if (diffMinutes >= 710 && diffMinutes <= 730) bucket = "12h";
  else if (diffMinutes >= 1430 && diffMinutes <= 1450) bucket = "24h";
  else if (diffMinutes >= 2870 && diffMinutes <= 2890) bucket = "2d";

  // 6. Only output the item if it falls into an active bucket window
  if (bucket !== "") {
    let outputJson = {
      id: recordId
    };
    outputJson[bucket] = views;

    itemsToUpdate.push({
      json: outputJson
    });
  }
}

return itemsToUpdate;(Note: Ensure you pull the timestamps and IDs dynamically using airtableData[i] in the loop, rather than using .first(), so the script accurately processes multiple active Reels at the same time).
Node 5: Airtable Update (Auto-Mapping)
- Operation: Update Record
- Because our Code Node structured the JSON perfectly to match Airtable’s backend (outputting the internal record
idand the exact column name like2h), we don’t need to write complex expressions here. - Under Mapping Column Mode, simply select Auto-Map Input Data.
- n8n will automatically locate the correct row using the ID and drop the live view count into the matching time column.
The Result
You now have a fully automated, zero-touch benchmarking system. The next time you post a Reel, you can open your Airtable base one hour later and immediately see how its trajectory compares to your best-performing videos. If the data says it’s a flop, pull it down, swap the hook, and try again.
Leave a Reply