At Zomunk, we monitor flight deals. Whenever we find a deal that is really good, usually 40-90% off, we share it with our subscribers.
The real challenge with running ads on these deals is the unpredictable lifespan of a deal. Some stay active for days, while others disappeared in a few hours.
Manually managing this became a massive operational bottleneck. Every single deal required a designer to create a creative, a marketer to take it live, and someone to manually monitor the expiry to pause the ad. Not very efficient, you see?
We solved this by building an automation pipeline. Now, whenever our backend sends a new deal via a webhook, the system autonomously designs the ad, writes the copy, and publishes it to Meta in seconds.
Here’s the technical breakdown of how we built this using n8n, Bannerbear, and the Meta Graph API.
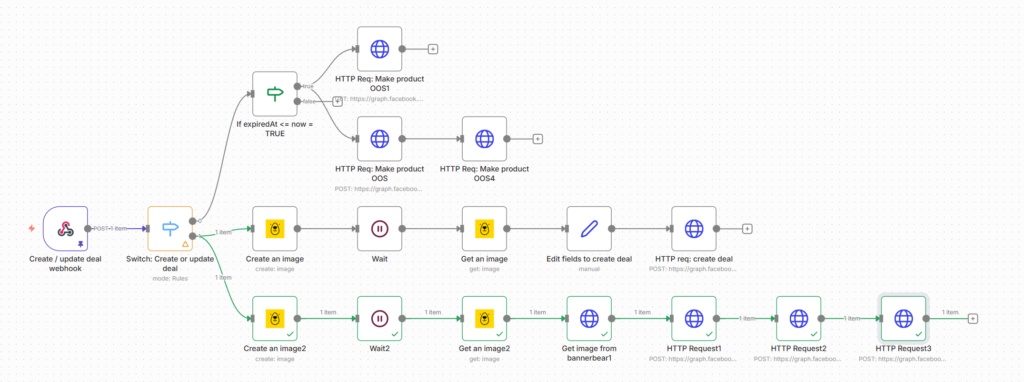
The trigger
Our backend sends a JSON payload containing the deal properties such as origin, destination, price, and deep links.
If the JSON contains a create flag, we start the ad creation flow.
This is obviously business-specific and will not be the same in your case.
The Logic Switch (If/Else Node): We route the workflow based on deal property:
if it has create→ Start Ad Creation Flow.if it has update→ Check Expiry Logic (The “Kill Switch”).
Automated Design with Bannerbear
We use a Bannerbear template with placeholders for the City Name, Price, and Background Image. We send a POST request to Bannerbear with the specific text and image URLs mapped from the webhook.
Depending on your template design, it should look something like this
{
  "template": "Rqg32K5QN---AY",
  "modifications": [
    { "name": "bg_img", "image_url": "<your-image-path>" },
    { "name": "city_name", "text": "Amsterdam" },
...
  ]
}Bannerbear is fast, but image rendering isn’t instant. Hence we need a WAIT node (I prefer waiting for 5s).
After the wait, we perform a GET request using the uid from the Bannerbear response to get the final .png URL, and then use an n8n HTTP Request node to download the file as binary data.
Meta Graph API Setup (Tokens & Permissions)
Before interacting with Meta API, you need a valid Access Token.
- Create an app, then navigate to https://developers.facebook.com/tools/explorer/ and generate a token
- Add the following permissions:
catalog_management, pages_show_list, ads_management, ads_read, business_management, attribution_read, pages_read_engagement, pages_manage_ads - Exchange your short-lived token for a Long-Lived Token using https://developers.facebook.com/tools/debug/accesstoken/ (add token, click debug, you will see extend token at the bottom)
Uploading the Image to Meta
Meta doesn’t let you just paste an image URL into an ad. You must upload the binary file to their servers first and get an Image Hash.
- Endpoint:
POST https://graph.facebook.com/v20.0/act_{AD_ACCOUNT_ID}/adimages - Body Content Type:
multipart/form-data - Input: The binary data from the previous Bannerbear download step.
Response: You will receive a hash (e.g., 509bb2b8fe...). Save this. You need it to build the creative.
Creating the “Dark Post” (Ad Creative)
This is where I spent the most amount of time debugging. tl;dr: If you use asset_feed_spec, Meta assumes you want a “Dynamic Creative,” which limits you to one ad per Ad Set. To create standard ads, you must use object_story_spec with link_data. Also make sure you are using instagram_user_id and not instagram_actor_id which is deprecated.
Your JSON payload will look something like this
{
  "name": "id or some unique name",
  "object_story_spec": {
    "page_id": "<id>",
    "instagram_user_id": "<id>",
    "link_data": {
      "link": "landing page link",
      "message": "Primary text goes here",
      "name": "headline",
      "image_hash": "{{ Object.values($json.images)[0].hash }}",
      "call_to_action": { "type": "BOOK_NOW" }
    }
  }
}Note the use of Object.values to handle dynamic filenames.
Taking the Ad Live
Finally, we link the Creative to an Ad Set.
Endpoint: POST https://graph.facebook.com/v20.0/act_{AD_ACCOUNT_ID}/ads
{
  "name": "ad-name",
  "adset_id": "adset-id",
  "creative": {
    "creative_id": "{{ $json.id }}"
  },
  "status": "ACTIVE",
  "instagram_user_id": "instagram-user-id",
  "tracking_specs": [
    {
      "action.type": ["app_custom_event"],
      "application": ["id from the dropdown you see while setting up app event tracking inside an ad"]
    }
  ]
}The “Kill Switch” (Handling Updates)
This may not be relevant to most businesses but we pause an ad (or OOS in catalog) when the deal is no longer active.
We use the Batch API to update the catalog instantly.
Endpoint: POST https://graph.facebook.com/v22.0/{CATALOG_ID}/batch
{
  "requests": [
    {
      "method": "UPDATE",
      "retailer_id": "{{ $('Webhook').item.json.body.data.payload.id }}",
      "data": { "availability": "out of stock" }
    }
  ]
}Pause the Ad
Since we don’t store the Meta Ad ID in our database, we find it by searching for the Deal ID (which we used as the Ad Name in Step 6).
- Search:
GET /ads?filtering=[{'field':'name','operator':'CONTAIN','value':'{{DEAL_ID}}'}] - Action:
POST /{AD_ID}with body{"status": "PAUSED"}
This automation turned a manual, 30-minute process into a 15-second autonomous flow. Our marketing bandwidth in managing ads for deals is effectively zero. By coupling n8n’s logic with Meta’s Graph API, we also ensure that Zomunk never advertises a deal that doesn’t exist.
Leave a Reply